This reknit project was created by Anne, one of the participants in my PhD research project in 2012-13.

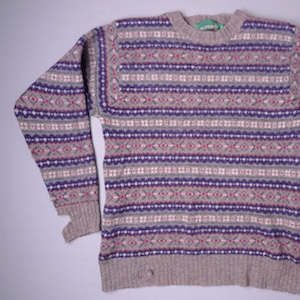
This is one of my daughter’s favourite jumpers. The ribbing on the welt and cuffs had lots of holes and there were holes in one of the sleeves. The jumper itself had felted slightly which made it all the more desirable to my daughter as it was windproof and she wore it for horse riding. It was therefore very much worth saving.
 This project appealed to me as it was fairly straightforward and something I felt was within my limited capabilities.
A major factor was trying to find suitable yarn locally. I couldn’t find a good colour match or a yarn fine enough to match the original machine knitting yarn. Amy kindly came to my rescue with some of her yarn which proved a really successful match.
I decided to take off the ribs, pick up the stitches and knit a new rib down from the main body of the jumper. I knitted two or three samples with different designs and I chose a chequered design to team in with the fairisle pattern and which was more decorative than the original plain rib.
 At first I decided to leave a couple of rows of the original rib so that it would blend in but I discovered that you cannot knit a rib stitch in the opposite direction to the original knitting, as it is half a stitch out and the rib doesn’t line up.
I therefore had to pick up the first row of stocking stitch, cut the rib off just below and tease out the loose stitches. This gave me a perfect line of stitches to work from. I was then able to knit the required depth of ribbing for the cuffs and the welt. By using a 2mm needle and Amy’s fine yarn I didn’t have to make any adjustments between the original and the new knitting.
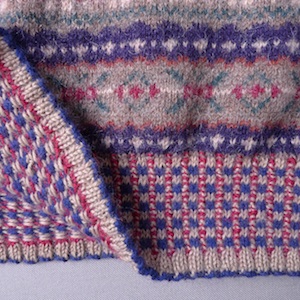
I also had to repair holes in the sleeves which I did by picking up the stitches at the bottom of the hole and knitting a matching patch which was grafted at the top of the hole and stitched in at the sides.
 I think I could have done this bit more neatly. I say I grafted in the top of the hole but I should have opened the row more rather than trying to graft to the stitches that were already open. I think I was too eager to finish and I didn’t want to make the holes any bigger. This meant that I grafted my patch partly to the open stitches of the top of the hole and partly on top of the neighbouring stitches either side as my patch was wider than the top of the hole. This made it a bit lumpy.
Because the original knitting was slightly felted and because it was a fairisle pattern this didn’t show too much but I would be bolder another time and open the hole more so the top of the hole had the same number of stitches as the bottom of the hole.
This has given the jumper a new lease of life. I would never have considered anything beyond just darning the holes before and would have probably decided it was too damaged for that. This whole project has been a revelation to me in not being afraid to have a go at changing or improving a garment. It has been inspiring to have Amy to teach new techniques and to have other people to exchange ideas with.
Want to have a go? Check out the Replace Cuff instructions page for detailed step-by-step guidance, or take a look at other projects using this treatment in the gallery.
