
Today I’m sharing another treatment on my reknitting sampler garment. I’ve previously posted about the stitch-hacked initials and frills; in this post I describe how I inserted a pocket to the fine fabric of the jumper. I adapted a technique described by Elizabeth Zimmermann – she calls it an ‘afterthought pocket’.
First, I decided how to construct the pocket: a single layer, knit-down pocket, with the pocket bag sewn on to the jumper.
At the same time, I calculated the transition for my pocket – how to change from the very fine gauge of the jumper (60 st/10cm) to something knittable. I measured a sample of my new fabric: 30 st/10cm. Nice numbers, so the calculation was easy: I just need to knit 2tog all along the row to give one new stitch for every two old stitches, and the fabric would lie flat.
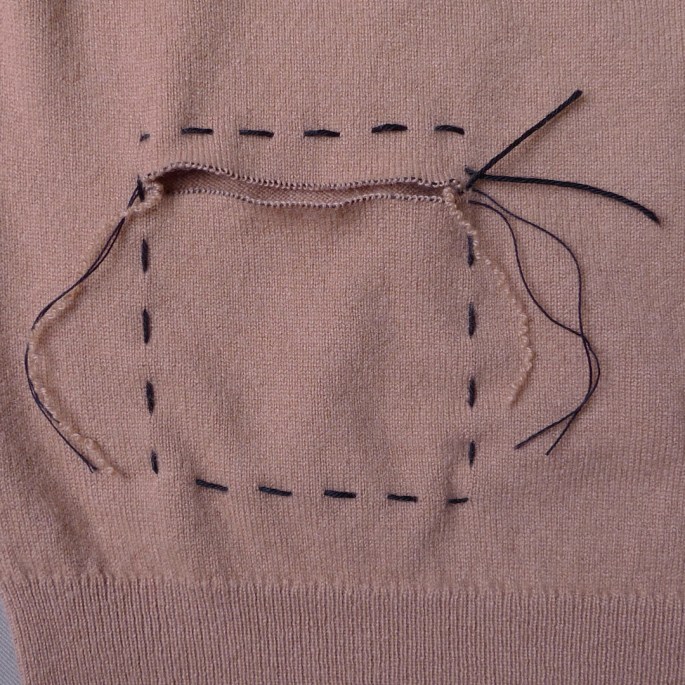
Next, I marked out the position of my pocket on the jumper, using a basting thread. I marked out the cardigan opening at the same time, to help me visualise the finished effect. I tried on the jumper to check I was happy with the position.

When I was ready to start the pocket, I carefully stitched through each stitch on the rows above and below the row I was going to open. Then, I cut a central stitch and carefully undid the row, stitch by stitch.
Then, I transferred the stitches from the top edge onto a 1mm needle. My first row was the transition, skpo (easier to knit than k2tog) all along the row. Then I carried on in stocking stitch.

When I’d finished the pocket bag, I sewed the sides of the pocket very carefully, staying in the same column in between stitches. At the base of the pocket, I grafted the open stitches to the jumper fabric, joining one pocket stitch to every 2 jumper stitches. It was hard to stay in line – the sewing took longer than the knitting! – but I think it was worth it in the end.

The last stage was to pick up the open stitches from the bottom edge of the opening, and knit a little trim for the top of the pocket. Again, I worked a plain 2tog transition, but this time did a garter version, and then went into double moss stitch. When I’d cast off, I sewed the edges of the trim down and tidied away my ends.


Want to have a go? Detailed step-by-step guidance for the insert pocket treatment isn’t available yet – but you might be able to figure it out using the description above. You could also take a look at other insert pocket projects in the gallery. The ‘How do I design it’ section of the Replace Cuff instructions will help with any gauge changes needed.
